Designing the MBLDC, a Custom ESC and BLDC Driver
With pride I can present the first hardware version of my own BLDC controller which I named the MBLDC for obvious reasons. In the last update I gave my reasoning for the different components I selected, as well as the wish to keep it small, and to keep it a one-sided PCB. In this post I can show you my design, the assembled PCB and even a spinning motor!

The puzzle that is PCB routing
After a lot of digging in the various datasheets I came up with the schematic that is available on GitHub . And with that the routing game could start. This is actually quite relaxing, like solving a Sudoku or a jigsaw puzzle. Because I wanted to keep the board as small as possible I opted for a 4-layer PCB, with dedicated power and ground layers. On top of that I made a large power plane across the PCB on the bottom signal layer. This to make sure that enough current can be transfered from the input side to the motor side.
Next to that I also tried to calculate the number of vias needed for current transfer to the MOSFETs. With all the components in place the final dimensions of the design are 62x40mm which I am quite happy with. The most challenging part to route was between the MCU and the gate driver as you can see on the picture above. The final design is shown below. I am also a big fan of the 3D view in KiCad, and as you can see it is a great indication of what your actual PCB will look like.

The power of computer aided design
The hardware
I am getting quite some practice with PCB assembly recently, because of the sales of my Bluetooth module. I am happy to report that my motor skills are improving, and I no longer require alcohol to keep my tweezers steady. I have also upgraded from a skillet to a pizza oven, and thanks to those things this PCB turned out right the first time .
The careful observer will notice three missing components near the logo. These were supposed to be capacitors for filtering the current measurements, but it turned out that I ordered 0306 components instead of 0603. I did not even know these existed. Well, that will be a nice test to find out if those caps are actually needed. This is actually something I plan to do with more components such as the external clock, to see if I can further simplify the board.


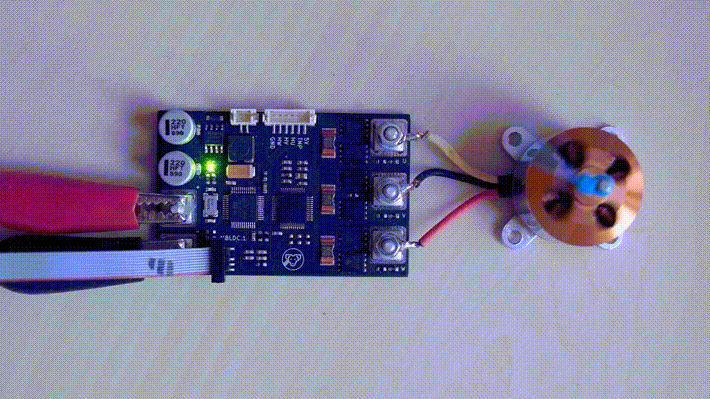
The assembled MBLDC
First Tests
I started by connecting my debugger to see if the board would actually talk to me. Since there is also a status LED on-board I could start with a blinky, and was very relieved to see that it actually worked. For this project I completely skipped the prototyping phase, and I have never created any hardware with a STM32, or any of the other components on this board basically. Therefore I had set my expectations for the PCB actually working quite low .
Each new test was a new small success. The LEDs work, the crystal works, the analog inputs work to read in the various voltages, currents and temperatures and the SPI communication with the gate driver all work too. Would that mean I could actually spin a motor with this thing?

Connected to my debugger for programming and online calibration
Once I validated that all functions are working individually I made my first attempts at spinning the motor. I set up my PWM timers, and started out by sending a low duty ratio at a fixed speed, and lo and behold, the motor started moving. Right now I have a partial implementation of back-emf sensing, and I can spin the motor at various speeds by setting a different duty ratio. The commutation switching points are then based on the back-emf, but much more work is needed here.
Here is proof that it actually works!
In the next post I will go in more detail on the software development for the motor controller. In the future the software will also be made available on GitHub.